2008-12-29

ViewSonic VX2260wm FullHD Display

When I connected my HF100 to a desktop monitor using a HDMI to DVI cable I only got a 720x576 pixel (4:3) display. I recently learned of the ViewSonic VX2260wm desktop monitor which should show the full HD output resolution of the HF100.

I say "should" since I'm cautious and have no experience with this device. If it works though this is an interesting studio monitor solution since Full HD TVs are usually much larger (30" and up), expensive and heavier. The ViewSonic VX2260wm is a 21.5", 16:9 monitor with HDMI input, 1920 x 1080 resolution and a good price.

2008-09-24

I'm unhappy

I became quite unhappy with the image quality of the HF100. It's always the same. First there was Super VHS and VHS suddenly looked bad. Then came miniDV, then HDV or AVCHD. Every step looked like a big progress. But in fact they where tiny steps, the sensors in the cameras always remained smaller then the fingernail of your pinky. The actual resolution makes one cry. Will there ever be an end to this? I think so. Image quality from large sensor still cameras is at a point where little improvement can be done. Photos look just great. Now movie quality has to catch up and all will be good. At least for 2D since we'll probably progress to 3D visualisation in our living room then :-)

I watched a lot of Nikon D90 DSLR videos recently at vimeo. This model has a sensor of the same size as a 35 mm cinema camera. The depth of field and the colors and the overall look of the videos makes my HF100 pale. Sure the D90 shows a lot of JPEG compression artefacts and has a low bitrate and no control but nevertheless it looks very good at 640 x 360 size. And it will only get better with upcoming models.

I recommend watching these videos from the D90 to get the feel of the "new look" future cameras promise. The D90 has bad resolution but the images feel warm and analog.
www.vimeo.com/1694439
www.vimeo.com/1696848
www.vimeo.com/1775787
www.vimeo.com/1713382

Now the HF100 is FullHD but can you watch it at that size on a computer monitor? I also have to scale its video down to 360p in order to look akzeptable. Still the HF100 images look "muddier" than the D90 ones. Sure you can do some "color grading" but if the material isn't optimal its frustrating. I always said that it's a miracle how such quality can come from such a tiny, tiny sensor but imagine what the HF100 could deliver with a large sensor. It can't be this small any more but who cares? In the past 35 mm size meant heavy, expensive cameras but it can be done in a very small package. E.g. the Micro Four Thirds standard promises small still/movie cameras with "huge" sensors and fast autofocus during movie recording. Autofocus is important since the shallow depth of field of large sensor cameras makes it difficult to focus manually, especially on the lcd screen (the viewfinder is disabled in movie mode). Vimeo is full of unsharp D90 videos because of this.


Pentax K20D(21f/s) + DA55-300mm from ligar on Vimeo.

The above movie represents the holy grail (Download and watch the original!). Some day there will be no difference between the quality of a photo and a movie frame. Until then we have to live with the crippled products the industry is willing to give us consumers.

After seeing the "look" of big sensor movies I will never ever buy a small sensor camera again. Period. By the way I observe all these changes at myphotomoviecam.blogspot.com

2008-09-10

LYTECUP exposure control device

Canon HV20/HV30 users also have no manual control over gain, arperture and shutter speed. The LYTECUPTM looks like a useful device. It seems to have a dimmable and diffused LED light source inside and allows to set arpertures and shutter speeds while keeping gain at zero.

I have no experience with this device but I think it would work just the same on the HF100. Maybe some adaption to the smaller lens diameter of the HF100 would be all that is needed. For someone experienced in electronics this could be an interesting DIY project using a LED, a diffuser, a battery, potentiometer, some capacitors, resistors and a NE555 integrated circuit to produce the pulse width modulation (PWM) for dimming the LED but its probably not worth the time if you can buy it readymade for a fair price.

You could use a light meter (expensive) or your point and shoot pocket camera to determine the correct exposure of a scene at a low ISO and 1/50 shutter speed. After this set the HF100 to Tv50 then set the correct arperture using the LYTECUP device. Some experiementing will be required though to find the corresponding ISO value of the "zero gain" HF100 setting.

2008-07-23

New HF11 model!

Canon in Japan just indroduced a new HF11 model that finally offers the maximal possible AVCHD data rate of 24 mbits/s. It has 32 GB internal storage and looks like the HF100 model. It will be available in September 2008 for 1.299 Euro.

2008-07-18

What settings do I use?

You can't do much wrong with the HF100 just make sure it's in FXP High Quality mode. If you want to shoot interlaced and you want to be on the safe side the "Easy" button isn't a bad idea.

If you're concerned of best possible motion capture of fast moving objects you may want to use 50i. I use PF25 exclusively and set the shutter speed in Tv mode to 1/50s because higher shutter speeds tend to show stuttering motion. Slower shutter speeds don't work well when the camcorder is handheld. It's the same as with photo cameras if the shutter speed gets too low you have to use a tripod.

At the moment I'm experimenting with Cinemode which looks promising. Here are some comments about this mode from different web forums:

"Cine mode uses a low contrast gamma - it gives more detail in shadows and highlights, creating a flatter looking image."
"Cinemode attempts to keep the shutter speed at 1/48 (NTSC) or 1/50 (PAL). If there's either too little or too much light to compensate with aperture, the shutter speed will be automatically adjusted. In very low light situations, some gain is applied too, but it tops out at 9dB."
"There's no manual control over shutter speed in cine mode."
"Cine mode turns off in-camera sharpening, so the resulting images are softer than with other modes. Generally, this is a good thing, because there are no halos caused by sharpening around edges. Most of the apparent sharpness can be applied back by sharpening in the edit, but unfortunately it also causes some real, unreversable loss in low contrast detail."
"The Cine mode on the HV30 matches the Canon XL A1's Cine V mode (Custom Preset #8)."
"The parameters of the Cine V preset are Gamma: Cine 1, Knee: Low, Black: Stretch, Sharpness: -4, Color Matrix: Cine 1, Color Gain: -20, Color Phase: +5, Red-Blue: -5, Green-Red: -5, Blue-Red: +5, and Red-Green: +12."

My experience with Cinemode so far is that in good light and with some contrast enhancement (and/or color correction) on the computer Cinemode gives very good results. It keeps gain low, stays around 1/50 shutter speed and rather opens the aperture to compensate for low light than increasing the gain. But again it needs enough light. You don't want this mode to go below 1/50s unless you shoot from a tripod.

Whatever you choose test it carefully first!

2008-07-10

PIXO C1 Universal Charger

This clever designed charger allows to charge Li-on batteries from almost any photo camera or camcorder. Just adjust two pins and insert the battery. The polarity is automatically dedtected and the battery is charged with all neccessary saftety protections. This seems to be a great alternative to the Canon charger, especially if you also have to charge Li-ion batteries from other devices. The street price is below 30 EUR. I don't own this charger but according to the manufacturer website it also charges "intelligent" or "smart" batteries. The C2 model additionally charges NiCd and NiMH batteries.

2008-07-09

Fair priced battery from Hong Kong

I bought a "Battery+Charger For Canon BP-809 BP809 HF10 HF100 Vixia" from the eBay merchant "lo100us" and I'm positively surprised. The product image at eBay was a generic one and I didn't expect much. The first shipment never arrived but a replacement sent on June 24 arrived today.

I payed around 30 USD including shipping. I call this a fair price. After all we talk about a small simple battery and a low tech charger and when Canon wants $120 for these items it's nothing else than a rip-off.

As you can see above the BP-809 clone has exactly the same shape and color as the original. The only thing missing is the "i" on the battery and in fact it's not "intelligent". The HF100 displays a battery symbol with a question mark instead of the remaining usage minutes. Since the battery info in the menu is also disabled there's no way to see the charge status of the battery. All you can do is waiting for the "Change the battery pack" warning.

The charger has a built in battery protection and fault detection circuitry. It automatically stops charging when the battery is full. The supplied charger also charges the original battery which is great.*

The charger comes with a plug adapter and can be operated with 100-250V 50/60Hz a.c. voltage.

Unfortunately the supplied adapter doesn't fit into German or Austrian power outlets which require a round plug.

Fortunately the two pins on the charger seem to conform to a standard because the problem was quickly solved after a visit to an electronics store. The charger even looks better with the new black plug adapter.

The battery seems to be of equal quality as the original one. I put an 8GB SDHC card in the HF100 aimed it at a clock and started recording. When I returned recording had stopped because the card was full which equals 1 hour of continuous recording.

The manual states that "intelligent" batteries may only be charged with chargers that are compatible to the "i" system. So far charging the original battery with this external charger works fine. The HF100 displays the usual 83 min usage time with the fully external-charged original battery inserted.*

Before someone comes and says the "intelligence" justifies the price difference lets put this straight: there's no computer built in. I'm pretty sure the circuit for the "intelligent" part of the original battery is veeery simple and cheap.

Some important things to know from the eBay merchant "91deals" which was mentioned in the comments (on his eBay product photos the charger and battery appear to be identical to the ones I've got):

  • Don't charge the clone battery in the camcorder always charge it externally with the charger that came with the battery.
  • Charge 2-3 hours more after the light on the charger turns green. (I don't understand this one. Any comments?)

*UPDATE: Charging the original battery worked fine the first time but after charging it several times over night problems appeared. The HF100 didn't recognize the fully charged original battery correctly. It displays a "Change Battery Pack" warning and displays a striked-through battery symbol. If I ignore the warning I can use the camcorder but the power button LED blinks green. Seems like the "intelligence" got offended by the cheap charger. The battery is full but it doesn't report that to the camcorder. I successfully restored the "intelligence" by emptying the battery in the camcorder and then charging it again with the supplied power adapter. I'll better charge the original battery in the camera from now on.

2008-06-22

Raynox 5050PRO with adapter ring - Really?

At first I used my 0.5x wide angle adapter without the supplied 37/37mm adapter ring. Then after a comment to this post I was convinced this adapter ring has to be used.

But sometimes I noticed a shadow in the corners, especially in the lower right one. I finally made a test today. As you can see below the shaded corners clearly come from the adapter ring.

The mean thing is that you don't see this on the LCD but later on the recording.

It looks like you shouldn't use the 37/37mm adapter with the HF100. Can someone confirm my observation? Raynox unfortunately never replied to my email regarding the adapter.

2008-06-19

The HF100 on a bike


Unterwegs from Martin Koch on Vimeo.

I fixed the HF100 to a bike and a bike trailer using a Manfrotto 035 Super Clamp to shoot the video above.

You get this type of clamp from stage lighting suppliers like this one in Germany or photo studio suppliers like this one in the USA.

The Super Clamp is made of metal with rubber protection padding and very strong. It clamps especially well to pipes from 13mm to 55mm diameter but can also be fixed to plane surfaces by using a supplied insert. Two mounting holes (which I used), one 1/4" and two 5mm threads and a secured socket for studs of all kind offer lots of possibilites to mount something to the clamp.

A Super Clamp plus a stud with 1/4" thread like e.g. the 037 or 036-14 (or a piece of 1/4" thread plus two nuts) is all you need to mount the camcorder to the handle bar of the bike. But since the handle bar is constantly moved while you drive it is better to mount the camcorder to the frame of the bike.

My solution consists of a 250mm long, 40mm x 50mm block of wood which I screwed to the clamp as shown below on the right. To mount the Quick Change Adapter I drilled two holes into it. Alternatively you can counter sink the thread for the tripod (as shown) and use just one counter sunk head screw.

This mounting method worked very well since the camcorder is away from the brake cables and above the front light. My bike has a horizontal frame rod but you can screw the wooden block at any angle to the clamp in order to have the camcorder horizontally mounted.

By rotating the camcorder adapter plate of the Quick Change Adapter the HF100 can be oriented at will.

I only filmed on smooth roads and tightened the clamp very well. I love my HF100 so please understand that I can't offer any experiences with mountain biking. Such shocks wouldn't be that good for the optical image stabilization system anyway.


A Quick Change Adapter is convenient but of course you can also use a 1/4" hanger bolt (a standard tripod thread is 1/4"-20 UNC) and a 1/4" wing nut. Note that you may not screw the HF100 any deeper than 5.5mm onto a tripod thread (see page 109 of the manual).

There are alternatives to the block of wood: An unfortunately expensive 244RC Magic Arm would be great as it allows a lot of positioning freedom. Maybe a 155RC Tilt-Top Head would also work if you can mount the camera to the very front of the bike frame. Or hows about a 042 Extension Arm with a 3/8" to 1/4" thread adapter if you don't own a Quick Change Adapter.


UPDATE February 21, 2012: I found the reasonable priced FEISOL Bicycle Mount. It's designed to be used with a ball head.

2008-06-14

Difference between the "PAL" and "NTSC" model

This Blog is about the HF100 "PAL" model (which I own) so keep in mind that my experiences with the "NTSC" model are just secondhand from what I've read on the web.

I've put PAL and NTSC in quotes because unlike the (old) television standards the image resolution of HD is identical in both worlds.

Nevertheless there's still a difference in frame rate. The HF100 "PAL" model records 50i or 25p while the "NTSC" model offers a 60i and 30p and also a 24p frame rate. The latter was added to offer a slower cinema like frame rate which the "PAL" model automatically has. The 24p of the NTSC model is not a "real" 24 fps recording as it is derived from 30 frames per second. Motion will not appear as smooth as if recorded with 24 fps natively. Don't ask me for details I never comprehended this matter completely.

Another difference is that the AV output ports will deliver 720x480@30fps on the "NTSC" model and 720x576@25fps on the "PAL" model.

I've heard that if you use a "NTSC" model in a PAL country (or the other way around) you will see the light flicker on your indoor recordings because the frame rate and the mains frequency do not match (50Hz vs. 60Hz). Otherwise photo cameras with movie mode record 30p worldwide so maybe this is just a problem with interlaced recordings. I don't know.

2008-06-10

HDMI Output to a TFT monitor

I don't have a HD device with HDMI input so I can't comment on that but I can tell my experience with HDMI output to a computer TFT monitor.

To connect the HF100 to a computer monitor with DVI input you need a Mini HDMI to DVI cable or as I did a Mini HDMI to HDMI cable and a HDMI to DVI adapter. Basically HDMI is DVI plus audio so both are compatible.

When you connect the HF100 to a DVI device the HDMI status in the camcorder menu says "DVI" and the output resolution from the HDMI port is only 720x576 pixel (4:3). As you can see below squeezing 16:9 into a 4:3 ratio distorts the image (Wendy and Bob aren't that slim). Nevertheless such a monitor is quite usefull as it - unlike the HF100 display - shows the complete recording area. The resolution though is a far cry from HD since the 720x576 get scaled up. Despite this the image looks quite good.

If you connect a 16:10 widescreen monitor and set it to fill the screen unproportionally the ratio is better (16:9 = 1.78 and 1920:1600 = 1.6). The output still remains 720x576 (4:3) which gets scaled up (more horizontally, less vertically).

I connected the HF100 to the Eizo shown above and a NEC wide screen monitor without problems but note that the HF100 manual says on page 79: "Correct operation cannot be guaranteed when connecting the camcorder to a DVI monitor".

Since HDMI is digital the HDMI cable can be quite long without quality loss.

The camcorder on screen info is not transmitted via HDMI out. It is via AV out though.

If you connect a cable to the HDMI port the AV ports do not work.

I'd be grateful if someone with a Full HD TV with HDMI input could comment what the HDMI status in the camcorder menu says and what resolution is output.

PF25 vs. 50i


HF100 - PF25 vs. 50i from Martin Koch on Vimeo.

As far as I know Vimeo changes the frame rate to 24 fps so please download and view the original 25 fps QuickTime version at Vimeo which is deinterlaced (I noticed that iMovie '08 exported the interlaced samples deinterlaced although I didn't check deinterlace source video during export).

To show you real interlaced footage I compressed two short original clips using the Photo-JPEG codec (the Apple Intermediate Codec is not available on Windows machines). The two PF25 and 50i clips are recorded at 1/50 shutter speed. You can clearly see the typical interlace combs in the 50i version. Download the samples at www.filefactory.com/file/c1df3c (200 MB).

I'm not convinced by the interlaced recordings. All versions "stutter" on a LCD but I found this is seldom a problem in real life. Also movies in the cinema are 24p and and no one complains that action movies would look bad. I think the movie people have their tricks to conceal any stutter (e.g. slow shutter speed = motion blur). I'll better learn from them and stick with PF25.

The future will be progressive TV displays that display 50p or 60p though.

2008-06-09

Setting Custom White Balance


Setting Custom White Balance from Martin Koch on Vimeo.

The example is a bit exaggerated very often Auto White Balance (AWB) does a good job.

Make shure that the white object you use is lit by the same light as the scene you're recording.

For best results use a dedicated white balance card as it should be correct white, without color cast. You can also test if a gray card gives you good results.

By setting Custom White Balance you can also avoid color shifts between different scenes under the same light. That happened for instance in "Der Hahn". I used AWB and in the fifth scene the grass has a completely different green than in the other ones although the light didn't change a bit.

Lens Hoods


Lens hoods minimize lens flare when shooting against the sun. Together with an UV filter the lens is also very well protected.

The 37mm lens hood shown above is offered on eBay by "hubi-77" (www.foto-tip.pl). The price is right and the quality is really good.

You need a filter on the lens (e.g an UV filter) to be able to mount these lens hoods. An UV filter is recommended anyway and it can be left on the camera all the time but if you don't want a filter on your camera there are also clear glass protection "filters" available.
If you find a lens hood with 47mm attachment diameter you could mount it directly to the camcorder without the need for a filter.

Such lens hoods are called "Tulpe" (German for tulip) because of their flower like shape. Usual round lens hoods would drop a shadow into the corners.

After seeing a HF100 with a rectangular lens hood at 00:44 in this video I'd prefer such a type. It looks way cooler. But note that such a wide lens hood covers the iAF sensor in front of the camera so there's only the slower through-the-lens contrast auto focus possible.


Don't follow me and buy a large 62 mm lens hood for the 0.5 wide angle converter as shown above. It will appear on the sides of the image at full wide angle. Don't even put a filter on because it will also be visible at full wide angle. I'm afraid no lens hood that mounts on a filter will work with the .5x wide angle converter.
The lens hood is not visible if you zoom in a little bit but since the display doesn't show the entire image you can't never be sure you zoomed in far enough (unless you use an external monitor).
The only lens hood that would work with the Raynox 5050 Pro is a large rectangular hood that mount's directly on the wide angle adapter which has about 67mm diameter at the front.

2008-06-06

Does the HF100 need an IR blocking filter?


Infrared blocking filter from Martin Koch on Vimeo.

As you can see above the HF100 records infrared light.

Therefore I bought the Heliopan Digital UV/IR blocking filter (Nr. 8025). It blocks invisible light below and above the visible light range. Visible light goes from violet at 400nm to red at 700nm.

This filter brings - according to the Heliopan website - better color seperation and rendition and reduced color channel noise. They say "it's absolute neccessary at artificial light".

I compared some shots with and without this filter and didn't see any difference. I think you can save your money and buy a normal UV filter instead. If I discover an advantage by using an IR blocking filter on the HF100 I'll let you know.

2008-06-05

Ein Hahn - Another .MTS clip


Ein Hahn from Martin Koch on Vimeo.

Today was a rainy day, no sun just clouds and I visited my favorite actors again with the HF100 on a tripod. When the light is right and you don't waste pixels i.e. get close to the object, the image quality of the HF100 is stunning.

Download an original 20s (50 MB) .MTS clip: HF100.MTS
This time without wide angle converter, just the HF100 with the arperture wide open.

2008-06-04

Behind the curtain of iMovie '08


A lot of people hate iMovie 08 and a lot love it. I like it because it offers everything needed for basic video editing and because editing becomes so quick and easy. If you watch a professional documentary you'll see that only very few transitions or effects are used. All you need to tell a story are a cross disolve transition and a fade from and to black, centered or lower third titles, additional audio clips, voice over recording and ... nothing else. All this is offered by iMovie 08. Remember it's the story that counts.

Apple offers excellent video tutorials on using iMovie 08 but I always feel uncomfortable when I don't have a clue how a software actually works.

iMovie 08 installs the AppleIntermediateCodec.component in Library>QuickTime.

If iMovie 08 came together with a new Mac you can reinstall it by choosing Install Bundled Software Only on the first DVD.

When you import AVCHD footage into iMovie 08 it gets converted to QuickTime movie files. These files are stored in an event folder. You can choose where to put this event folder during import so it's no problem to use an external harddisk for video storage for example. To find the original file right-click a clip thumbnail and choose Reveal in Finder.

It's not obvious but you can also move entire event folders within iMovie. To do this click on the harddisk icon to the right of the "Event Library" title to switch to View Events by Volume then drag and drop the event folder to its new place. All files will be moved to the new location.

After the import, thumbnails of your footage are generated and stored in an iMovie Thumbnails folder within the event folder. These thumbnails are tiny Photo-Jpeg compressed QuickTime movies.

iMovie 08 will also generate an iMovie Cache folder within the event folder

The quickest method to add a scene to a project is selecting a range of frames in the events window and then pressing E on the keyboard.

The first step to repair clip display problems is to delete the thumbnail and cache folder within the events folder. You can do this safely, iMovie 08 will rebuild them after a restart.


The QuickTime movies in the event folder remain untouched all the time. Basically iMovie 08 is a nondestructive controller for QuickTime files. The control info - the actual project file - is stored in Movies > iMovie Projects on your main harddisk. If you right-click on a .rcproject file, choose Show Package Contents, double click Project and navigate to $objects you will see that all information about your edits is stored in this file. The size, the location of the original video or additional audio file, the in and out point of the edit, the titles, everything is managed by this project file.


The most dangerous operation (at least with the current 7.1.1 version) is deleting unused clips. If your projects are finished and exported you can right-click on an event folder and choose "Move Event to Trash" and then choose "Delete Unused". This is the only destructive operation by iMovie 08 since it trims the original QuickTime clips in the event folder to just the portions that are actually used in projects. This is very useful as it frees up a considerable amount of harddisk space after emptying the trash.

If this operation doesn't complete though you'll be left with a complete mess. I strongly advise to back up the event folder and the project file before you do this. If the operation completes successfully you can delete the backup and enjoy the additional storage space but if not, you'll be able to restore the event and project. Alternatively you can reimport all clips from the backup of the SDHC card. You made a backup didn't you?

Below is what happened to me after an unsuccessful deletion of unused clips. AVCHD import turned footage into animated impressionist paintings. Nothing helped only after deleting some older projects AVCHD import suddenly worked again.

Sometimes when iMovie refuses to import AVCHD it helps to go online or to turn off Airport!? Another option is to remove non Apple Quicktime components such as Perian.

Finally I want to reveal an Apple "secret" and introduce the person responsible of this new, quick and promising concept of video editing. iMovie 08 is the work of Randy Ubillos no less a person than the creator of the first three versions of Adobe Premiere and of Final Cut Pro! Here's the proof.

2008-06-03

Quick Change Adapter

Quick Change Adapters are extremely useful when using a camcorder on a tripod. This particular adapter is made by Manfrotto in Italy. It can be mounted to any 3/8" or 1/4" tripod thread.

The battery release switch at the bottom of the HF100 remains accessible.


Quick Change Adapter from Martin Koch on Vimeo.

2008-05-31

2008-05-26

My Mac talks to the HF100

If you're tired of going into the menu over and over again just to set something there's a solution. Let your Mac do it. All you need is a ZephIRTM. This USB device enables you to use your computer to control almost any piece of equipment designed for infrared remote control. You can train it's software to simulate any remote control and on top of that everything can be controlled via AppleScript.

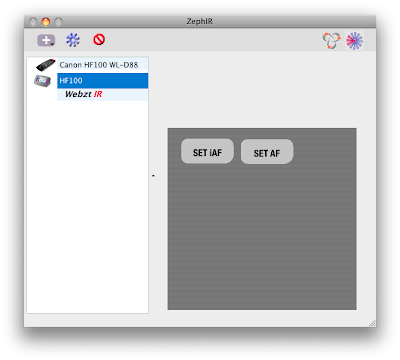
My ZephIR arrived today and after an hour of "training" and trial and error my HF100 listens carefully to my Mac. I recorded all of the 20 buttons of the Canon WL-D88 wireless controller and also submitted the component to the ZephIR data base.To download it open the ZephIR application, click on "WebztIR" then navigate to Canon > Camera > HF100_WL_D88 and double-click the remote (you must be connected to the internet).

For instance the following command would toggle the on-screen displays:

fire zephir command "DISP" of component "Canon HF100 WL-D88"

The really interesting thing is that the supplied software allows to build custom remotes with buttons that execute a batch of AppleScript commands at once. To get a reliable response I recommend adding a delay before fireing a subsequent command.

If you use File > Open Dictionary in the Script Editor and select the ZephIR application you'll see that it offers a repeating and delaying option:

fire zephir command v : Send a fire command to the ZephIR™.
fire zephir command text : name of command
of component text : the target component
[repeating integer] : override the designated repeat count of the code (minimum 1, maximum 35)
[delaying integer] : wait the number of ticks (60 ticks per second) before firing (minimum 0, maximum 300,default is 10)
→ text : The reply returns a status string if the request fails otherwise it is empty.

Below is a first try which allows to set normal autofocus or instant autofocus with a single mouse click. All I have to do is to make sure that the ZephIR aims at the remote sensor of the HF100 before I press a button. Watching the ZephIR wading through the menus is fun and about ten seconds later the new AF mode is set. Note that the connection depends on a light path and that the ZephIR acts blindly. If there's an interruption in the connection either through bad placement or by unintentionally concealing the connection you'll end up anywhere in the menu. Also note that the following example is for the HF100. The HF10 let's you choose between the SD card and the internal memory so there may be one additional menu item. Adjust the code accordingly.

The AppleScript for setting iAF looks like this:

(*SET iAF*)
fire zephir command "MENU" of component "Canon HF100 WL-D88"
fire zephir command "RIGHT" of component "Canon HF100 WL-D88" delaying 120
fire zephir command "DOWN" of component "Canon HF100 WL-D88" delaying 60
fire zephir command "SET" of component "Canon HF100 WL-D88" delaying 60
fire zephir command "UP" of component "Canon HF100 WL-D88" delaying 60
fire zephir command "SET" of component "Canon HF100 WL-D88" delaying 60
fire zephir command "MENU" of component "Canon HF100 WL-D88" delaying 60

As you can see the required AppleScript is straightforward and the possibilities are numerous. Everything you can do with the wireless controller can be simulated and even more.

Controlling a timelapse recording where the HF100 takes a photo every minute for one hour requires just four lines of AppleScript. Note that storing a photo takes about 4 seconds so the minimum possible interval is 5s.

(*TIME LAPSE*)
repeat 60 times
   fire zephir command "PHOTO" of component "Canon HF100 WL-D88"
   delay 60
end repeat

The HF100 only offers a two second SELF TIMER delay when it is triggered by the wireless controller. You also have to activate the SELF TIMER in the menu before each and every recording. The following code allows one-click self timed recordings with a delay of 10 seconds. The "beep sound" is the actual system alert sound which can be altered in the OS X System Preferences.

(*SELF TIMER*)
repeat 10 times
   beep
   delay 1
end repeat
beep 2
fire zephir command "START-STOP" of component "Canon HF100 WL-D88"

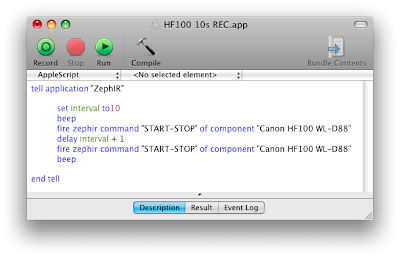
How's about a remote controlled 10s recording?

(*TIMED RECORDING*)
fire zephir command "START-STOP" of component "Canon HF100 WL-D88"
delay 10 + 1
fire zephir command "START-STOP" of component "Canon HF100 WL-D88"

Smooth computer controlled zooming is now easy (set the zoom speed to the slowest speed ">" in advance):

(*ZOOM IN*)
fire zephir command "ZOOM T" of component "Canon HF100 WL-D88" repeating 35 delaying 1

Precise focus shift or rack focus (press set and toggle to FOCUS first). The correct repeating number must be found by trial and error:

(*FOCUS SHIFT*)
fire zephir command "UP" of component "Canon HF100 WL-D88"
fire zephir command "RIGHT" of component "Canon HF100 WL-D88" delaying 60 repeating 20

The following code initalizes the card (use it with caution!):

(*INITIALIZE CARD*)
display dialog "This will initialize the card. Continue?" 
fire zephir command "MENU" of component "Canon HF100 WL-D88"
fire zephir command "DOWN" of component "Canon HF100 WL-D88" delaying 120
fire zephir command "RIGHT" of component "Canon HF100 WL-D88" delaying 60
fire zephir command "DOWN" of component "Canon HF100 WL-D88" delaying 60
fire zephir command "SET" of component "Canon HF100 WL-D88" delaying 60
fire zephir command "DOWN" of component "Canon HF100 WL-D88" delaying 60
fire zephir command "SET" of component "Canon HF100 WL-D88" delaying 60
delay 5
display alert "The card has been initialized." 
fire zephir command "SET" of component "Canon HF100 WL-D88"
fire zephir command "MENU" of component "Canon HF100 WL-D88" delaying 60

The ZephIR application itself is scriptable. A slightly altered version of the 10s recording example above would look like this in Apples Script Editor (or any application that supports AppleScript):

AppleScript is very powerful just take a look at the AppleScript Language Guide for details. Right now I'm only scratching the surface.

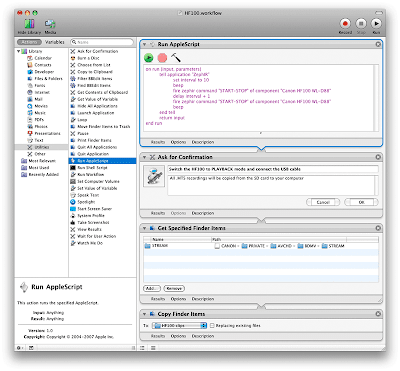
Next you can see the AppleScript integrated into an Automator workflow that copies the recordings to your computer. Unfortunately you can't access the SD card in recording mode. You must manually switch to playback mode and connect the USB cable. The camcorder turns into a "dumb" harddisk and only becomes responsive again when you eject the camera and disconnect the USB cable. Considering this it's far easier to take the SD card out and put it into a card reader.

So far I only controlled recording but imagine using the ZephIR connected to a MacBook Air to control a High-Def presentation delivered by the HF100.

2008-05-25

HF100 color comparison

AVCHD support on the Mac

Editing MPEG4 needs a lot of processing power. It's highly compressed and to achieve this just a few frames contain the entire image information. In the majority of frames just the differences from previous frames as well as predictions for future frames is stored. That means that the editing software must constantly decode a lot of neighbouring frames to restore the frame you're currently working on. This is much more demanding than MPEG2 editing and even the latest Mac Pro has a hard time to do this fluidly. iMovie 08 can edit pure MPEG4 video with AAC audio natively (not AVCHD!) but forget about the scrubbing feature if you try this. Of course, over time when computers get faster this will change.

If you consider the current situation, it's nothing but clever by Apple to convert all AVCHD clips to the Apple Intermediate Codec (AIC) since you wouldn't be satisfied with the user experience of native AVCHD editing on todays computers. The AIC is a high quality MPEG2 intra frame codec that is easy to handle on all current Macs. Intra frame means that each frame is compressed individually which is very edit friendly. The conversion is not lossless but you will not see any quality loss just like you will not see a quality loss in JPEG compressed images at high quality settings. It's generally a good idea to leave the highly compressed MPEG4 codec as soon as possible.

AIC clips are QuickTime movies that can be played on Windows or OS X. The screenshot below shows the QuickTime Player info window of an AVCHD clip that was converted to the Apple Intermediate Codec by iMovie 08. As you can see the data rate is very high which ensures quality. The Dolby encoded audio of the HF100 is converted to 48 kHz uncompressed stereo audio.

The only disadvantage of the conversion is that your compact .MTS clips become much, much larger. Typically the factor is eight so a 1GB AVCHD clip will occupy 8 GB of hard disk space after conversion. An external 500 GB disk that is dedicated to video editing for instance will hold about 7 hours of AIC encoded video from the HF100.

As of May 2008 all video editing solutions from Apple convert AVCHD. iMovie 08 and Final Cut Express 4 convert to the Apple Intermediate Codec while FinalCut Pro has an additional ProRes option with even higher quality (and file size). Note that the current Final Cut Express 4 doesn't support the FXP mode of the HF100. It still uses 1440x1080 (the HDV standard) intern and scales up to full HD.

AVCHD import is only supported on Intel Macs. Users of older Macs or iMovieHD can use the utility VoltaicHD from shedworx.com

At the moment (May 2008) only the video player of Toast 9 can play .MTS AVCHD files directly.

Update November 2008: Adobe Premiere Pro CS4 allows native AVCHD editing on a Mac.

2008-05-24

Backup of HF100 AVCHD clips

If your video editing software is able to import .MTS clips directly then just copy the STREAM folder on your SDHC card to your computer and rename the folder. Give it an unique name (e.g. event_date). Then you can burn up to half an hour of AVCHD clip folders on a DVD-ROM or up to one hour on a double-sided one and store it away.

iMovie 08 and Final Cut Express 4 don't import .MTS files directly. They import from a supported camcorder, the SDHC card, a mounted disk image or a DVD-ROM. In order to be able to re-import the HF100 clips you must backup the entire BDMV folder of each card. This folder contains the STREAM folder as well as thumbnail and clip info folders that are needed by the import window. To backup the videos on a SDHC card just copy the BDMV folder to an unique named folder on your computer.

To be able to re-import into iMovie you can burn the BDMV folder to a accordingly labeled DVD-ROM. iMovie 08 will recognize a mounted DVD as shown below and automatically open its AVCHD import window.

The second possibility is to use a disk image. Open Disk Utility and go to File > New > New Blank Image... Choose a volume size thats large enough for your BDMV folder and click OK.

Copy the BDMV folder to the mounted disk image and start iMovie 08. iMovie 08 will recognize a disk image as shown below and automatically open its AVCHD import window. You can also archive such disk images.

Another option is to make a disk image of the entire SDHC card using Disk Utility. To do this open Disk Utility, click on the SDHC card then go to File > New > New Image from ... An exact copy of your SDHC card will be saved to your boot drive. Archive, mount and import such an image as explained above. The only disadvantage of this method is that the disk image size is always the size of the SDHC card even if it's half full.

I've tested this with iMovie 08 version 7.1.1 but I strongly recommend that you test it too on your computer before relying on it.

UPDATE: If you have to backup a 16 GB SDHC card to standard DVDs move .mts files that do not fit on the first DVD into DVD2, DVD3 and DVD4 folders and burn just the .mts clips to additional DVDs (I'm assuming that no single clip is longer than 30 minutes e.g. <4.7 GB).
To restore the card copy "DVD1" with the original folder structure to the harddisk then fill the STREAM folder with the missing .mts clips from DVD 2, 3 and 4.
For import into iMovie '08 use "Make image from folder" in Disk Utility and mount it. I don't know if Final Cut Express 4 needs a mounted image but Final Cut Pro 6 imports just fine from a folder with the original structure.

Original Canon HF100 AVCHD clip


Original Canon HF100 AVCHD clip from Martin Koch on Vimeo.

Just in case you want to test AVCHD import before buying this camcorder.

HF100_PF25_NEUTRAL.MTS (10MB)
Original .mts file for direct import or for conversion using VoltaicHD from shedworx.com

HF100_SDHCcard.dmg (10MB)
Intel Mac users can mount this disk image to import the clip into iMovie 08.

Enjoy!

Please note that the corners are blurry because I zoomed in too far with the 0.5x wide angle converter on the camcorder. This was nonsense since a wide angle converter is not designed for tele settings (I learned this by now) and does blur the corners when you zoom in too far. I also didn't use a required 37/37mm adapter ring. That's why the corners are so blurry. The HF100 alone will not blur any edges regardless of zoom setting.

2008-05-22

Where are the video files and photos?

The screenshots show the folder structure of a SDHC card recorded by the HF100

Buried deep, the video files:

The place where JPG compressed photos end up:

Using a gray card


Using a gray card with the HF100 from Martin Koch on Vimeo.

A gray card is a great way to adjust a "technically" correct exposure in controlled lighting conditions that don't change during shooting. It can also be useful to set the exposure in difficult scenes like e.g. an object in front of a bright background. You'll find gray cards at any serious photo store.

Put the gray card under the same light as your main object. Point the camera at the card, step close or zoom in on it and adjust the exposure in manual mode.

On the HF100 there's no manual mode. You can either lock a certain arperture (Av mode) or shutter speed (Tv mode). In the video above I show you how to display the exposure settings, how to lock the shutter speed to 1/50s and then how to also lock the arperture (and gain) setting chosen by the HF100.

How the HF100 controls exposure

If you press the Photo button on top of the camera half down the current arperture and shutter speed get displayed. You will notice that these two settings change very little when you point the camera to brighter or darker scenes.

Unlike a professional camcorder the HF100 does a lot behind the curtain. To control exposure it uses:

  • Shutter speed
  • Arperture
  • Gain in low light
  • Most likely a variable neutral density (ND) filter in bright light

So rather than changing the arperture or shutter speed, gain or ND filter come into play. A ND filter does no harm it only controls the amount of light but gain is bad. Gain is electronic amplification of the sensor signal similar to the ISO setting on a photo camera. As you probably know a small sensor and high ISO means noise. The same is true with high gain. Just like you want to shoot at ISO 100 to get good looking pictures with a minimum of noise you want to shoot at zero gain.

I don't know a trick to display the gain used by the HF100. If you read this article about controling exposure on the HV20 you'll see that the only way to expose the gain setting of a particular recording was to put the tape into another camcorder model and to display the info there.

The Remote Control

I appreciate that camcorders always come with wireless remote controllers. It's so handy to be able to control the HF100 without ever touching it. The remote sensor on the camera is large and placed at the upper left corner of the display. I would prefer a slightly larger remote though.

Since I find the placement of the Photo button on top of the camera not very convenient I prefer to trigger my photo shots with the remote control. This has the added benefit that there's no camera shake due to pressing the button.

The Battery Pack

The HF100 is tiny and so is the supplied BP-809 battery pack (7.4V 890mAh Li-ion). The battery is "intelligent" and reports the remaining usage time with an accuracy of one minute to the camcorder. A fully charged battery reports 80 minutes but in real life it's much less.

I took the HF100 with a fully charged battery and a 4GB SDHC card to a trip to Graz. My concern that the card would be too small was unneccessary. I recorded about 100 very short clips over a time span of several hours, didn't review them and closed the LCD between most recordings. Note that closing the LCD turns on a power safe mode. I also completely turned off the camcorder when not in use for a longer period. Mind you I still had recording space for about 15 minutes when the battery was empty. So unless you let the camcorder record continuously the effective output of the standard battery will only be between 15 to 30 minutes of footage since camcorder preparation and framing shots use up a considerable amount of battery time.

Canons marketing people obviously know that you need a second battery so they price this spare part accordingly. Alternatively you can buy the very expensive BP-819 battery pack with more capacity that will protrude from the back. Currently there are no third party Li-ion batteries available but that should be only a matter of time. If you can pass on the "intelligence" cheaper alternatives with their own charger will certainly do.

Update: I ordered a cheap battery plus charger last week from a Hong Kong eBay dealer and will post my experience when it arrives.

The battery gets charged in the camcorder within 155 minutes. That means you can't use it while you are charging. If you use two batteries the camera is occupied twice as long and when the second one is charged the first one no longer is "fresh". An external charger is available as an - again rather over-priced - accessory.

If you connect the camcorder to the supplied compact power adapter you can use it without inserted battery.

A less tall alternative to the BP-809 is called BP-808.

UPDATE: My battery problem is solved!

2008-05-21

HF100 + Wide Angle Converter


Doesn't it look cool? I've chosen the Raynox HD-5050PRO. It matches the camera perfectly and it costs less than the WD-H37C 0.8x wide-converter offered by Canon. The HF100 now feels very professional and valuable because of the added weight.

Read the comment by Gareth about the supplied 37/37mm adapter ring then read my observation.

The widest angle of the HF100 lens equals 43 mm on a 35 mm camera. This is very little wide angle - in fact that's no wide angle at all - so a wide angle converter will help you out in tight places. A 0.5x wide angle converter will widen the view to a 22 mm equivalent and show twice as much.

The HF100 doesn't display the actual zoom values, just a tiny bar. Below is the approximate 35 mm equivalent zoom range of the HF100 without and with 0.5X wide angle converter. I retrieved the values from the JPEG Exif data and rounded the figures for the 1/4, 1/2 and 3/4 positions of the zoom display so you can easier memorize them. Since the the midpoint between W and T is the only zoom position that can be set with a certain accuracy these very rough figures will suffice.

Basically this means you can use an 0.5x wide angle converter up to half of the zoom range. The rest is (and should be) covered by the HF100 without converter.

Below is a wide angle shot at f8 with the Raynox HD-5050PRO mounted. I think the converter is pretty good. It's considerable sharp at the borders and there's no darkening of corners visible. Note that this is only true for wide angle shots. Don't use such a converter in tele mode because it's not designed for this and the image gets very unsharp at the corners. Download the original JPEG.

Below are three scenes without and with the converter. The zoom was always at it's widest setting.


HF100 without and with 0.5x wide angle converter from Martin Koch on Vimeo.

Note that 22mm is an extreme wide angle and if you put a filter on the converter it will be visible at full wide angle.